 |
Lemmings
Remappable Gestures For Unity
|
|
Lemmings
Remappable Gestures For Unity
|
Whether you download Lemmings from GitHub or from the Unity Asset Store (submitting soon) you will need to follow the same basic steps once it is integrated in your project.
The Lemmings Shepherd is a script that is very useful and very important. It is not required in every case but it is highly recommended for beginners because it allows you to see all of the relevant information for your project in a single location. The Shepherd displays information on all of your relationships and Lemmings and also ensures that its children are preserved during scene changes in more complex projects.
Method 1
Select a GameObject that is to be used as a manager or controller for your experience and manually add the LemmingShepherd component.
Method 2
Use the Lemmings Menu to select Game Objects > Create Lemming Shepherd (Singleton)
Important:
The Lemming Shepherd is a singleton, which means there can only ever be one in a given scene. Do not try and have multiple Lemming Shepherds.
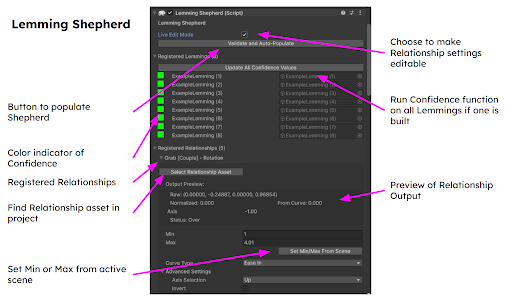
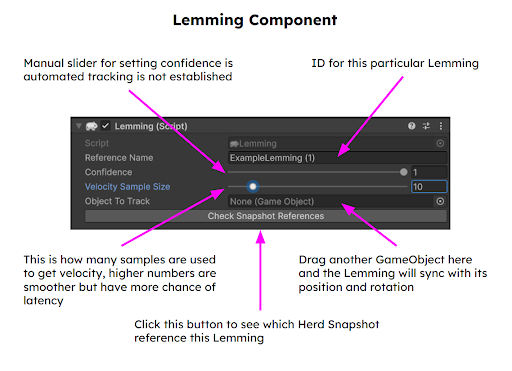
Lemmings are the GameObjects whose position and rotation is used to determine the spatial relationships which define gestures. Make any objects that you wish to use as Lemmings into children of the Lemming Shepherd by dragging them beneath it in the hierarchy.
Rename these objects for clarity if it is appropriate to do so.
Lemmings can be any GameObject in your scene. If you want to track existing objects, such as the bone joints of a rig, just make sure that they are children of the Lemming Shepherd first, preferably by bringing in the entire rig hierarchy. Otherwise, you can use basic game objects and, once the Lemmings script has been added, you can drag bones and other tracked features into the ‘Object to Track’ field.
Herds are collections of Lemmings that are available to a particular relationship for remapping. Each relationship can have its own herd but for this introduction we will simply include all of the Lemmings in your scene.
Open the Herd Manager by selecting Lemmings > Create Herd Snapshot Using Herd Manager.
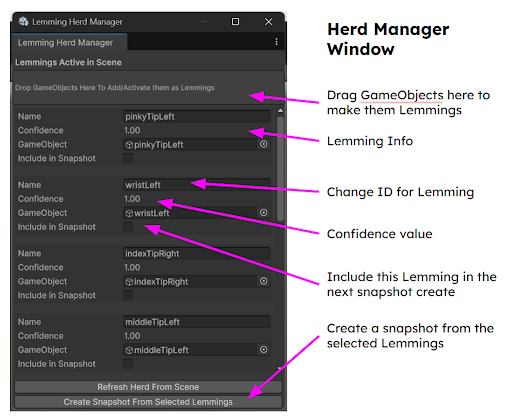
At the top of the Herd Manager Window you will see a box that says ‘Drag game objects here to add/activate them as Lemmings’. Drag any game objects that you want to use as Lemmings into that box and you will see them added to the manager. Doing this ensures that they have the Lemmings script added to these objects as a component. You can name these objects in the Herd Manager window to give them a relevant and memorable name, such as ‘thumbTip’.
For this introduction, make sure that all of the boxes named ‘Include in Snapshot’ are checked as true, then click the button ‘Create Herd Snapshot From Selected Lemmings’.
Important:
Herd Snapshots need to be saved in the Resources folder of your project. By default they are saved to the correct location, but please try not to move them or it will not work.
The Lemming Relationship is a scriptable object that lives as an asset in your project, not as a GameObject in your scene. This allows it to hold settings and values that can be accessed from any scene and from any part of a project.
You can create a relationship by selecting Lemmings > Create New Relationship from the menu.

There are four types of Lemming Relationship:
Single
These relationships are the most basic and rely on the position and rotation of a single object.
Couple
These relationships are the easiest to use and compare the position and rotation of only two objects. These are useful for basic interactions, such as a pinch, and their data is the easiest to understand and remap. They have Leader and Follower roles to help communicate their function to users.
Throuple
A throuple is defined by three objects and is more complicated to use and understand than the couple but it has the ability to create more nuanced gestures. Roles for the throuple are Leader, Follower, and Third.
Group
Groups are relationships that can include any number of Lemmings. They lack the precision of the more focused groups but are useful for interpreting the behavior of large collections of objects such as looking at the total size of the body, or determining the direction that the entire body is moving in.
For this introduction we are going to create a simple relationship in the form of a Couple. I am going to walk through the Relationship settings by section in order to avoid confusion.
ID is the name that will be displayed internally for developers via the input system and also externally to users via the remapping UI. Give your relationship a name like ‘SetVolume’
Description is useful to developers but intended for users. It is a field where you can write a clear description of the relationship and its intended uses for end-users, as well as providing them access to useful insights or options for remapping. Write a description for yourself to remind you what you are doing with this relationship.
Use Input System is a box that allows you to select whether or not you want this relationship to be part of Unity’s Input System. Set this to true for now.
Herd is a field where you can select a Herd Snapshot for this relationship. You can drag this in from your assets window, but it is easier to click on the circle and select a herd Snapshot from the options provided
Family Type is a dropdown field that allows you to select which type of relationship this will be. Select the couple option.
Min is the minimum setting for your threshold. Set this to 100 for now.
Max is the maximum setting for your threshold. Set this to 200 for now.
Proxy and Settings are not relevant for now.
This is where you select which Lemmings to include in your relationship and what role they will play. Each role will have a dropdown box associated with it, allowing you to select from the list of Lemmings defined in your Herd Snapshot. For this introduction - select two different Lemmings, one for the Leader role and one for the Follower role and then click the ‘Finalize Member Assignment’.
Important: You will need to click the ‘Finalize Member Assignment’ button or the relationship will not be initialized.
Metric is a dropdown that allows you to select which metric you would like to use for determining the value of this gesture. Each size of family has different options. For now, select Distance from the dropdown field.
There are advanced options unique to each metric, such as selecting the unit of measurement for calculating distance. This is set to centimeters by default and we will not make changes now.
Curve is a dropdown that lets you select what type of curve will be used to interpolate the normalized value. For now, leave this as the default, which is Linear.
Go to the menu and select Lemmings > Update Input System Layout.
Go to menu and select Lemmings > Game Object > Create Lemming UI
Add the Lemming UI Visibility Controller Component to your Lemming Shepherd

This adds the UI to your scene and will let you remap the setting in Play Mode. This is what a user would see when they are remapping gestures. There is a default layout for this but many end users will want to customize this for their project. By default you can open this window by pressing the escape key, but you can use the dropdown to select a different option if you choose.
There are numerous other ways to use Lemmings and I will try to include as many as I can in this documentation, but this is a basic setup that should allow you to experiment with the interface and start making connections or interactions. While Unity is in play mode, try moving your selected Lemmings and you should see the values update in the inspector. If you press the escape key, the remapping UI should appear and you can try remapping the setting directly from there in play mode.
Add the Lemmings Device Manager component to the Lemmings Shepherd
Go to the Lemmings Menu and select Lemmings > Update Input System Layout
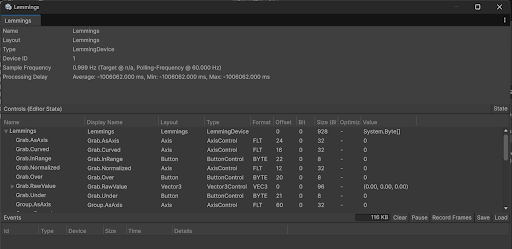
If you want to use Unity’s input system these steps will set up Lemmings to output Unity input events that you can access via the Action Map. Lemmings will be listed as an available device and should have 7 Outputs - virtual buttons called Over, Under, and InRange, a variable input (using this can make remapping more limited) called Raw, as well as 3 float values, Normalized, Curved, and AsAxis. AsAxis is optimized for the input system and is normalized as -1 to 1.
Go to the Lemmings Menu and select Lemmings > Game Objects > Create Lemmings Relationship Proxy
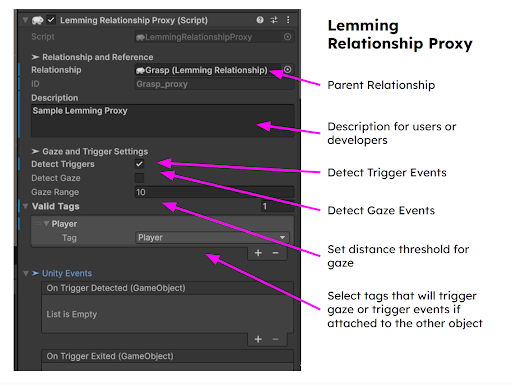
Once you have created your Proxy you can assign a relationship to it and set it up for mapping trigger events or visualization.
Go to the Lemmings Menu and select Lemmings > Game Objects > Create Lemmings Secondary Metric
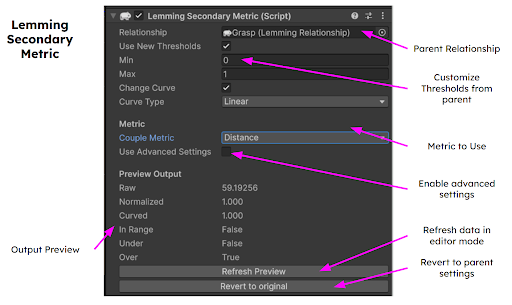
Assign a relationship to the Secondary Metric and choose which metric and which settings you would like to use.